
Fireplace Brick Painting White Wash Versus Color Wash
Fireplace Brick Painting White Wash Versus Color Wash
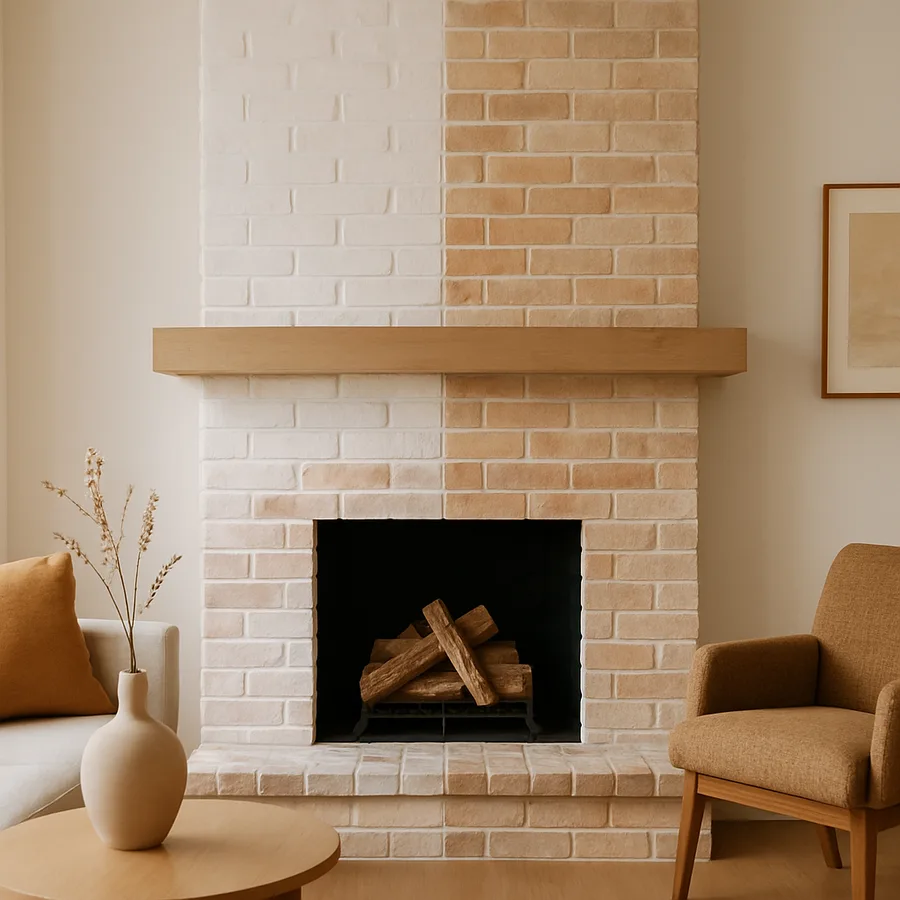
A brick fireplace can be the magnetic center of a room or the visual anchor that holds the whole design back. When the brick is in good condition but visually heavy, dated, or simply at odds with the rest of the room, paint is one of the fastest and most reversible ways to reset the entire space. The challenge is that brick is not drywall, and slapping a coat of latex on it the way you would paint a hallway is one of the more reliable ways to produce a result that everyone in the household regrets within a year. The two techniques that consistently deliver beautiful, durable, design-forward results are white wash and color wash, and the choice between them shapes both the immediate look and the long-term maintenance of the finished fireplace.
This guide walks through what each technique actually is, how the materials and chemistry differ, what kind of surface preparation each one demands, and which technique is the right call for different rooms and design directions. It then covers durability, longevity, and the realistic timeline for repainting or refreshing the finish years down the road. The goal is to send you into your project with a clear plan rather than a Pinterest-fueled improvisation.
What White Wash and Color Wash Actually Are
White wash, in its traditional form, is a thinned coating that lets the underlying brick texture and color partially show through the paint. The classic recipe is a mixture of water and white latex paint, typically in a one-to-one or one-to-two ratio, applied with a brush or sponge and often partially wiped back with a damp rag while still wet. The result is a softened, weathered look that holds onto the texture and movement of the original brick while shifting its color toward a creamy off-white that blends with almost any palette.
Color wash uses the same fundamental technique but substitutes a pigmented paint or stain for the white. The wash might be a muted greige, a warm putty, a soft black, a chalky grey, a green-tinted neutral, or any color that complements the room's overall scheme. Like white wash, color wash preserves brick texture and creates depth, but it shifts the brick toward a specific color story rather than simply muting it. Color wash is often described as a more design-forward choice because it integrates the fireplace into a deliberate palette rather than neutralizing it.
Both techniques sit between the two extremes of leaving the brick raw and painting it with opaque solid coverage. Solid paint can look heavy and tends to read as a strong design statement that becomes hard to undo. Raw brick can clash with contemporary palettes and dominates the room visually. A well-executed wash lives in the middle ground, modernizing the fireplace while preserving the character that drew you to the brick in the first place.
Why Surface Preparation Makes or Breaks the Project
Brick is porous, dusty, and historically often coated with soot, smoke residue, and the chemical byproducts of decades of fires. Skipping or shortcutting the preparation phase is the single most common reason that a fireplace paint job fails within months. The minimum preparation sequence is a thorough vacuum to remove loose dust and debris, a scrub with a stiff bristle brush, a wash with a degreasing cleaner appropriate for masonry, and a full rinse with clean water followed by at least 24 hours of drying time.
For fireplaces that have seen heavy wood-burning use, the cleaning sequence often needs to include a TSP substitute or a dedicated masonry cleaner to cut through years of accumulated creosote and smoke residue. Skipping this step traps the contaminants under the new finish, and within weeks or months the residue will bleed through the paint as yellow or brown discoloration that no amount of touch-up will permanently solve. The NFPA 211 standard on chimneys and fireplaces is primarily concerned with safety, but it indirectly addresses surface finishes by requiring that combustion residues be cleaned to certain standards, and a thorough cleaning before painting addresses both the safety and the aesthetic concerns at once.
Have you ever wondered why some painted brick fireplaces look beautifully intact a decade later while others develop peeling or staining within a year? The answer is almost always the prep. Skilled painters routinely spend more time on the cleaning and prep phase than on the actual painting phase, because the durability of the finish is determined long before the brush touches the brick.
White Wash Technique Step by Step
The classic white wash approach begins with mixing your wash. Combine high-quality latex or acrylic paint with clean water at a roughly one-to-one ratio for a heavier wash, or one part paint to two parts water for a lighter, more transparent effect. Test the mix on a single brick in an inconspicuous corner before committing to the full surface, because brick absorbency varies dramatically between brick types, and the same wash can read very differently on different bricks.
Apply the wash in small sections, typically two to three square feet at a time, using a wide brush. Work the wash into the brick face and into the mortar joints, taking care not to flood the mortar so heavily that it pools and dries unevenly. While the wash is still wet, use a damp rag or sponge to gently wipe back portions of the wash on the brick faces, letting some of the underlying brick color and texture show through. The wiping is what creates the depth and movement that distinguishes a real white wash from a thinly painted brick.
Work in good light, ideally with natural light if possible, because the wet wash always looks different from the dry wash, and judging the final effect requires being able to see the developing pattern clearly. After the first coat dries fully, evaluate the result and decide whether to apply a second coat for more coverage or to leave it as is. White wash is forgiving in this regard because additional coats build coverage gradually, and you can stop when the look matches your intent without having committed to full opacity.
Color Wash Technique and Palette Considerations
Color wash follows the same procedural arc as white wash but with attention to color theory and palette integration. Start by selecting a wash color that complements rather than competes with your room's primary palette. Warm putty and greige tones work well in transitional and traditional rooms with warm wood accents. Soft blacks and deep charcoals create dramatic, contemporary fireplaces that anchor minimalist or industrial spaces. Muted greens, blues, and slate tones integrate beautifully with nature-inspired interiors and Scandinavian-influenced designs.
The mixing ratio for color wash is generally one part paint to one to three parts water, with the exact ratio depending on the intensity of color you want and the underlying brick color. Darker brick may need a heavier wash to read clearly, while lighter brick takes color very readily and may benefit from a more dilute mix. As with white wash, test on a single brick before committing to the full surface, and remember that the wash will dry lighter than it appears when wet.
One technique that elevates color wash dramatically is layered washing, in which two complementary wash colors are applied in sequence with brief drying time between coats. A first wash of soft grey followed by a lighter wash of warm white, for example, produces depth and complexity that no single color can deliver alone. This approach takes more time and more material but rewards the investment with a finished surface that reads as genuinely artisanal rather than as a simple color treatment. The Brick Industry Association notes that brick is one of the most paint-receptive masonry materials when properly prepared, with documented finish lifespans of fifteen to twenty-five years for high-quality latex applications, which means a well-executed layered color wash can be a very long-lived design investment.
Paint Chemistry, Heat Tolerance, and Code Considerations
Not every paint product is appropriate for fireplace brick, and the choice of paint matters more than the choice of technique. For the face of the fireplace surround, which sits outside the firebox and never experiences direct flame contact, standard latex or acrylic interior paint works well, with most quality products rated for surface temperatures up to 200 degrees Fahrenheit. That ceiling is well above what the exterior brick face actually reaches during normal fireplace operation.
The firebox interior, where direct flame and sustained high heat are present, is a different story entirely. Interior latex will blister and fail within a single burning season, and any finish applied inside the firebox must be a high-temperature paint specifically rated for stove and fireplace interior use, typically tolerating temperatures up to 1,200 degrees Fahrenheit. Most homeowners are well served by leaving the firebox interior unpainted, and limiting white wash or color wash strictly to the exterior surround and any visible exterior chimney brick within the room.
Code generally does not regulate the cosmetic finishes on a fireplace surround, but local fire codes may govern the materials and clearances around the fireplace opening, and any cosmetic finishing should respect those clearances. The International Code Council publishes the IRC clearance tables that govern combustible material proximity to the fireplace opening, and while paint on the brick itself is non-combustible once cured, any framing or trim within the clearance zone needs to remain compliant regardless of cosmetic treatment.
Choosing the Right Approach for Your Room
Match the technique to both your design intent and the existing condition of the brick. White wash is the right call when you want to lighten and brighten a room, when the existing brick reads as too heavy or too red for the rest of the palette, when you want a transitional or coastal aesthetic, or when you want a result that integrates with the broadest possible range of future furniture and decor choices. White wash is genuinely a neutral that works with almost any direction the room might evolve toward.
Color wash is the right call when you want the fireplace to contribute deliberately to a specific color story, when the room has a clear design vocabulary you want to reinforce, when you want a more contemporary or designer-driven look, or when you want a result that becomes a distinctive feature rather than a quiet neutral. Color wash demands more commitment to a specific direction, and it works best when paired with intentional palette choices elsewhere in the room.
Are you uncertain which direction is right for your space? Consider photographing your room from multiple angles, gathering paint chips in candidate colors, and digitally compositing the chips into the photos to preview how each treatment will read. Many paint manufacturer websites offer free visualization tools that let you upload a photo and try different wash colors before committing. A single afternoon of digital experimentation can save you weeks of regret over a finish that does not work in the actual room.
Conclusion
White wash and color wash are both excellent options for transforming a brick fireplace, and the right choice depends entirely on your room, your palette, and how much you want the fireplace to contribute to the design rather than simply step aside. White wash delivers a softer, more neutral result that works in almost any setting and pairs well with the broadest range of design directions. Color wash delivers a more distinctive, design-forward result that anchors a specific palette and rewards intentional choices elsewhere in the room.
Whichever direction you choose, the durability of the finish is determined primarily by the surface preparation rather than by the paint product or the technique itself. A meticulously cleaned and prepared brick surface will hold either wash for fifteen years or more with minimal touch-up, while a sloppily prepared surface will betray your investment within a single year regardless of how skillful the brushwork was. Spending an extra day on prep is the single highest-return investment you can make in the project.
Finally, remember that this is a reversible design decision in the broad sense. Painted brick can always be repainted, refreshed, or even stripped back closer to the original character if your taste evolves over time. That reversibility makes the wash techniques a particularly low-risk way to transform a room, especially compared with more permanent changes like tile cladding or full surround replacement. If you have been hesitating to update a dated fireplace because you are worried about making a mistake, the wash approach gives you a tested path that delivers dramatic results while preserving your flexibility for future updates.
Start your project this weekend: photograph your fireplace from multiple angles, gather wash color samples that complement your room palette, plan a full day for thorough surface preparation, and test your chosen wash on a single inconspicuous brick before committing to the full surface. With that disciplined approach, you will be enjoying a transformed fireplace by next weekend, with a finish that holds its beauty for the next decade and beyond.


Comments
Post a Comment