Cubby Bench Built In for Window Seat Reading Spots
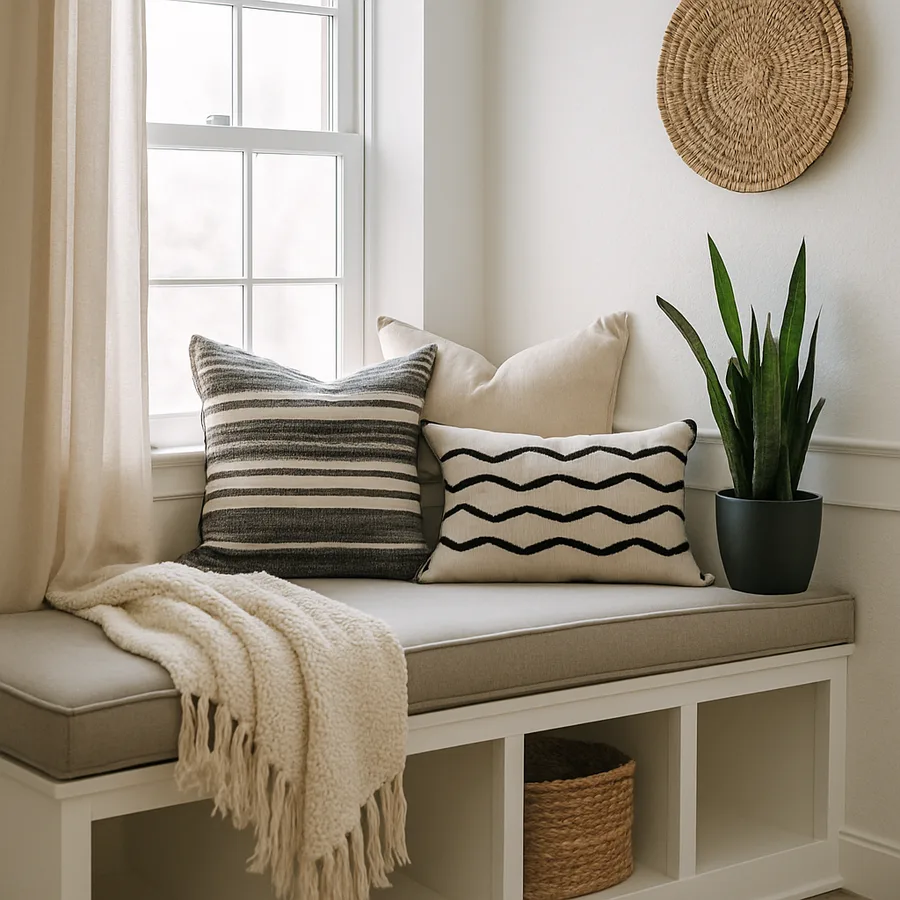
A bay window with no plan is wasted square footage, but a built-in cubby bench transforms that same alcove into the gravitational center of a living room or bedroom. Combine a window seat with open cubbies and you get bench seating, hidden storage, display niches, and a dedicated reading spot in the same footprint. The carpentry is approachable for confident DIYers, the materials are forgiving, and the payoff is the kind of architectural moment that makes a house feel custom rather than catalog-built. According to a recent National Association of Home Builders survey, 73 percent of buyers rank window seats and reading nooks as a "desirable" or "essential" home feature, putting this build squarely in resale-friendly territory.
Why a Cubby Bench Is the Smartest Reading Nook Build
A cubby bench works harder than almost any other piece of built-in furniture because it stacks four functions into a single envelope. The seat surface gives you a daybed for reading, a perch for putting on shoes, or extra seating when guests overflow the sofa. The cubby openings hold baskets, books, board games, or shoes, depending on whether the bench lives in a living room, bedroom, mudroom, or kid's room. The face frame and trim act as architectural punctuation, anchoring the window above and giving the wall a focal point that pure furniture can never deliver.
Have you ever measured how much depth a comfortable reading bench actually needs? Most professional designers settle on a seat depth between 20 and 24 inches, with cushions at 4 to 6 inches thick, which means the rough carpentry box can be as shallow as 18 inches and still feel generous. That shallow profile is exactly why these benches work in tight spots, like the leftover space beside a chimney breast or under a dormered second-story window where a sofa would be ridiculous and an armchair would feel marooned.
The cubby logic also solves a real problem in modern open-plan rooms, which is the lack of edges where life can collect. A built-in bench with three or four open cubbies below gives kids a place for backpacks without a closet, gives adults a landing zone for the morning crossword and a thrift-store throw, and gives the room a horizontal datum that makes everything else feel more deliberate. The result reads as architecture, not storage furniture, which is the line between a built-in that adds value and a built-in that looks bolted on.
Choosing the Right Window for Your Built-In
Not every window will accept a bench gracefully, and the smartest first move is matching the wall to the build rather than forcing the build into the wrong wall. The strongest candidates are bay windows, dormers, deep-set casements with sills 18 to 30 inches above the finished floor, and any wall where the window is flanked by short returns or knee walls that you can use as natural stops. If the sill sits too high, you end up with a bench that feels like a step stool to the glass; if the sill is too low, you lose head clearance and the cushions cover half the view.
The publication Better Homes and Gardens recommends a finished seat height between 17 and 19 inches, which mirrors a standard dining chair, and a sill-to-seat clearance of at least 12 inches so cushions and pillows do not hide the lower sash. Measure twice before you commit to a frame depth, especially if you have wood floors with seasonal movement or baseboards you plan to scribe around. The other variable people forget is HVAC: many older homes route a supply register directly under the window, and you cannot bury one without rerouting the duct or cutting a vent grille into the toe-kick.
Consider sun exposure too, because a south- or west-facing window seat will bake fabric, fade paint, and warp solid-wood lids if you do not plan for it. Linen and cotton cushion covers fade fastest, while solution-dyed acrylic and performance polyester hold color for years; the American Society of Interior Designers notes that UV exposure can degrade upholstery fibers up to 50 percent faster on west-facing windows than on north-facing ones. A simple cellular shade or interior shutter solves the problem without giving up the view that made the spot worth building into in the first place.
Sketching the Cubby Layout and Proportions
Before any saw runs, sketch the bench at full scale on the wall with painter's tape and chalk. Draw the outer footprint, the seat line, the toe kick, and every cubby opening. This costs nothing and prevents the most expensive mistake in built-in carpentry, which is realizing post-assembly that the cubby openings look squat or the spacing fights the window mullions above. Aim for cubby openings that are at least slightly taller than they are wide, because vertical proportions read as architectural, while square cubbies read as cheap cubbies.
For a bench that runs 60 to 72 inches wide, three cubbies usually feel right; below 60 inches, two cubbies look more honest; above 84 inches, four cubbies start to land. Keep an even number of dividers and let the dividers align with significant lines above, like the window's vertical mullions or the centerline of an upper sash. A cubby opening of roughly 14 inches wide by 12 inches tall comfortably accepts a standard wicker basket, a stack of magazines, or a few large coffee-table books on their sides.
The toe kick is the unsung hero of a built-in bench. A 3- to 4-inch recessed toe kick at the bottom lets feet tuck under without scuffing the face frame, separates the bench visually from the floor, and gives you a clean place to terminate baseboard from the adjacent wall. Skip the toe kick and the bench reads as a box on the floor; include it and it reads as architecture. Plan the toe-kick height before you order materials, because it changes the cubby height math and the overall seat height.
Materials, Joinery, and Finish Carpentry Choices
For the carcase, three-quarter-inch plywood is the workhorse, and birch or maple plywood gives the cleanest paint-grade result. Avoid MDF for the bench top and any horizontal seat surface because it sags under load and swells if a drink ever spills; reserve MDF for vertical face frames and trim where it shines. Pocket screws and glue at every panel-to-panel joint give plenty of strength for seating loads, while the face frame can be solid poplar for paint or solid white oak for stain. The Master Painters Institute publishes a finishing standards reference, and the Master Painters Institute notes that latex enamel applied over a bonding primer holds up better on cabinetry than oil-based paint, which yellows over time on horizontal surfaces.
If you want hidden storage in addition to open cubbies, build a hinged seat lid using a piano hinge or two heavy-duty soft-close lid stays so kids cannot slam fingers. Compartmentalize the under-seat space with vertical dividers so blankets, board games, and seasonal pillows each get a home. For the seat top itself, glue and screw a frame of 2x4s under three-quarter-inch plywood to span the opening without sag; cushions then sit on top with a thin batting layer to bridge the seam. Add a few quarter-inch ventilation holes at the back of any closed compartment so trapped moisture can escape.
For trim, a beadboard or shiplap back panel inside the cubbies adds depth and shadow that flat plywood never achieves. Tongue-and-groove planks running vertically inside each cubby read as cottage; horizontal shiplap reads as transitional; flat plywood with a routed bead reads as classical. Keep the trim language consistent with the rest of the house so the bench feels native, not imported. A simple cap rail across the seat front, with a 45-degree return at each end, is the detail that separates "built it myself" from "had it built."
Cushions, Pillows, and the Comfort Layer
The cushion is what turns a plywood box into a reading nook, and skimping here ruins an otherwise excellent build. A minimum cushion thickness of 4 inches with high-density foam (around 2.5 pounds per cubic foot density) gives enough support to read for an hour without numbness; bump up to 5 or 6 inches if the bench will pull double duty as a guest sleeping spot. Wrap the foam in Dacron batting before upholstering to soften the corners and prevent the cushion from looking like a foam slab.
For fabric, ask yourself who is going to use the seat and what they are likely to spill. A west-facing reading nook in an adult living room can take linen or velvet; a kid-zone bench beside a bay window in the family room needs performance fabric with a stain-release finish. Crypton, Sunbrella, and Revolution all make textiles that handle juice, ink, and pet hair without showing wear. Loose pillows in two or three coordinated patterns add the styling layer; a long lumbar pillow plus two square pillows is the standard formula that reads as designed without looking fussy.
Wondering whether cushions should be sewn with a fitted box construction or left as a knife-edge pillow? Box construction with welt cord looks tailored and wears better, but knife-edge cushions are easier to make and replace. Whichever you choose, plan for a removable zip cover so the cushion can be cleaned or recovered seasonally without rebuilding from scratch. Benjamin Moore publishes coordinated paint-and-fabric palettes that make matching cushions to wall color far easier than guessing from a swatch fan.
Lighting, Styling, and the Final Twenty Percent
A reading nook without dedicated light is a half-finished build. The best solution is a wall-mounted swing-arm sconce above the bench, ideally with a hardwired junction box installed during framing or a plug-in cord run through a discreet channel. Two sconces flanking the window read symmetrical and let two people read side by side; a single sconce on the dominant side reads more intimate. Aim for a 2700K to 3000K bulb with a dimmer so the same nook works for morning coffee and late-night reading without a lighting change.
Styling the cubbies is the step that ties the entire build to the rest of the room. Start with a base layer of woven baskets in the lower cubbies for visual mass and storage, then layer in stacks of art books with the spines turned out, a single sculptural object per cubby, and one or two cubbies left intentionally empty so the eye has somewhere to rest. The temptation to fill every cubby is exactly what makes built-ins look cluttered; restraint is what makes them look custom. Architectural Digest regularly features built-in benches as case studies in how negative space inside open shelving signals high-end design.
Finish with the small details that elevate the build: a small tray on the seat for a coffee cup and book, a wool throw folded across one corner, a single trailing plant in a clay pot on the windowsill above. These twenty-percent moves are what move the bench from "carpentry project" to "favorite spot in the house," and they cost almost nothing compared to the rest of the build.
Conclusion: Building a Spot That Earns Its Square Footage
A cubby bench window seat is one of the rare home projects that improves daily life and resale value at the same time. The build itself is mostly straight cuts and pocket screws, the materials are widely available, and the finish carpentry can be as ambitious or as restrained as the rest of the house demands. What separates a great bench from a forgettable one is not the joinery but the proportions, the cushion depth, the sconce above the shoulder, and the disciplined styling of the cubbies below.
If the project feels intimidating, start small. Tape out the footprint, build a single mock-up cubby from scrap plywood, and live with the layout for a week before committing to materials. Most carpenters will tell you that the planning phase prevents the most expensive mistakes, and a bench built into a window deserves more planning than the average shelf because the window itself is fixed and unforgiving. Match the seat height to a dining chair, the cushion depth to a sofa, and the trim language to the rest of the room, and the bench will feel like it has always been there.
If you have the wall, the window, and a free weekend, this is the project that pays back every hour you put into it for years afterward. Mark off the wall this week, sketch the cubbies, and start your cut list. A reading nook is not a luxury; it is a quiet rebellion against the open-plan rooms that have nowhere comfortable to sit alone with a book. Build the bench, hang the sconce, fill the basket with throws, and the rest of the house will gradually rearrange itself around the new center of gravity.
More Articles You May Like


Comments
Post a Comment