Transform Your Home Gym: Fitness Tips for Small Spaces
Designing a home gym within a compact footprint demands the same spatial intelligence that professional interior designers bring to any challenging room. Whether you are working with a spare bedroom, a converted garage bay, or an underused corner of your basement, the principles of proportion, flow, and visual weight apply just as firmly to fitness spaces as they do to living rooms. The American Society of Interior Designers (ASID) reports that dedicated workout rooms rank among the top five most-requested residential projects, yet most homeowners assume they need a sprawling basement to make the concept work. That assumption is simply wrong. A well-designed home gym can thrive in as little as sixty square feet when every element, from flooring to lighting to mirror placement, is chosen with deliberate purpose. The key is treating your fitness area not as a utilitarian afterthought but as a designed environment that motivates movement and supports recovery. Have you ever walked into a boutique studio and felt an immediate urge to train harder? That reaction is engineered through design, and you can replicate it at home.
Assessing Your Space and Defining Functional Zones
Before ordering a single piece of equipment, measure your available room down to the inch and sketch a floor plan that accounts for ceiling height, door swing radius, ventilation points, and electrical outlets. Interior designers certified through the NCIDQ (National Council for Interior Design Qualification) follow this exact protocol for every residential project, and there is no reason to skip it for a gym. A floor plan prevents the common mistake of cramming oversized equipment into a room where the user cannot extend arms, lunge forward, or swing a kettlebell without striking a wall.
Divide your space into functional zones even if the total area is modest. A strength zone might occupy one wall with a fold-down squat rack and a compact barbell set, while a cardio zone takes a neighboring corner with a foldable treadmill or a stationary bike. A third zone, reserved for stretching and bodyweight work, needs nothing more than clear floor space and a yoga mat. Professional designers at firms listed on the IIDA (International Interior Design Association) directory often use colored tape on bare floors to prototype these zones before committing to permanent fixtures. This zoning approach borrows from smart home integration principles, where every square foot is assigned a purpose through careful planning rather than guesswork.
Consider vertical space as an extension of your floor plan. Pegboards, wall-mounted resistance band stations, and ceiling-anchored suspension trainers exploit height that would otherwise go unused. Shelving installed above head height can store foam rollers, jump ropes, and towels, freeing floor area for movement. The goal is to design a room where equipment lives on surfaces you do not need for exercise, a principle that professional organizers and interior designers both champion. Once your zones are mapped and your vertical storage planned, you have a blueprint that guides every purchase and placement decision that follows.
Flooring Choices That Protect Joints and Dampen Noise
Flooring is the foundation of any home gym, and the wrong choice can cause joint pain, equipment damage, and noise complaints from family members or neighbors below. Rubber flooring tiles, typically priced between eight and fourteen dollars per square foot installed, remain the gold standard because they absorb impact, resist moisture, and grip athletic shoes without being so sticky that lateral movement becomes difficult. ASID-affiliated designers recommend a minimum thickness of three-eighths of an inch for general fitness and three-quarters of an inch under heavy lifting platforms. These thicknesses balance cushioning with the stable, non-compressible surface that safe squatting and deadlifting demand.
For homeowners who want their gym to double as a guest room or play area, interlocking foam tiles offer a removable alternative that stores flat in a closet. However, foam compresses under heavy loads, which makes it unsuitable for racks or benches that concentrate weight on small contact patches. A hybrid approach works well in small spaces: install permanent rubber under the strength zone and use removable foam or cork tiles in the stretch zone. Cork, a sustainable material gaining traction in Japandi-influenced interiors, provides natural antimicrobial properties and a warm tactile feel that rubber cannot match, making it ideal for barefoot yoga and mobility work.
Color and pattern matter more than most homeowners realize. Dark charcoal rubber creates a commercial-gym atmosphere, while lighter gray or speckled finishes open the room visually, a critical advantage when square footage is limited. Houzz trend reports show that speckled rubber in warm tones, think terracotta fleck on a gray base, is gaining popularity because it connects the gym to the organic palette trending in adjacent living spaces. Choosing flooring that harmonizes with the rest of your home prevents the gym from feeling like an industrial island, and that visual continuity encourages you to spend more time in the space. With your floor set, the next design layer to address is the one that multiplies every square foot you have: mirrors.
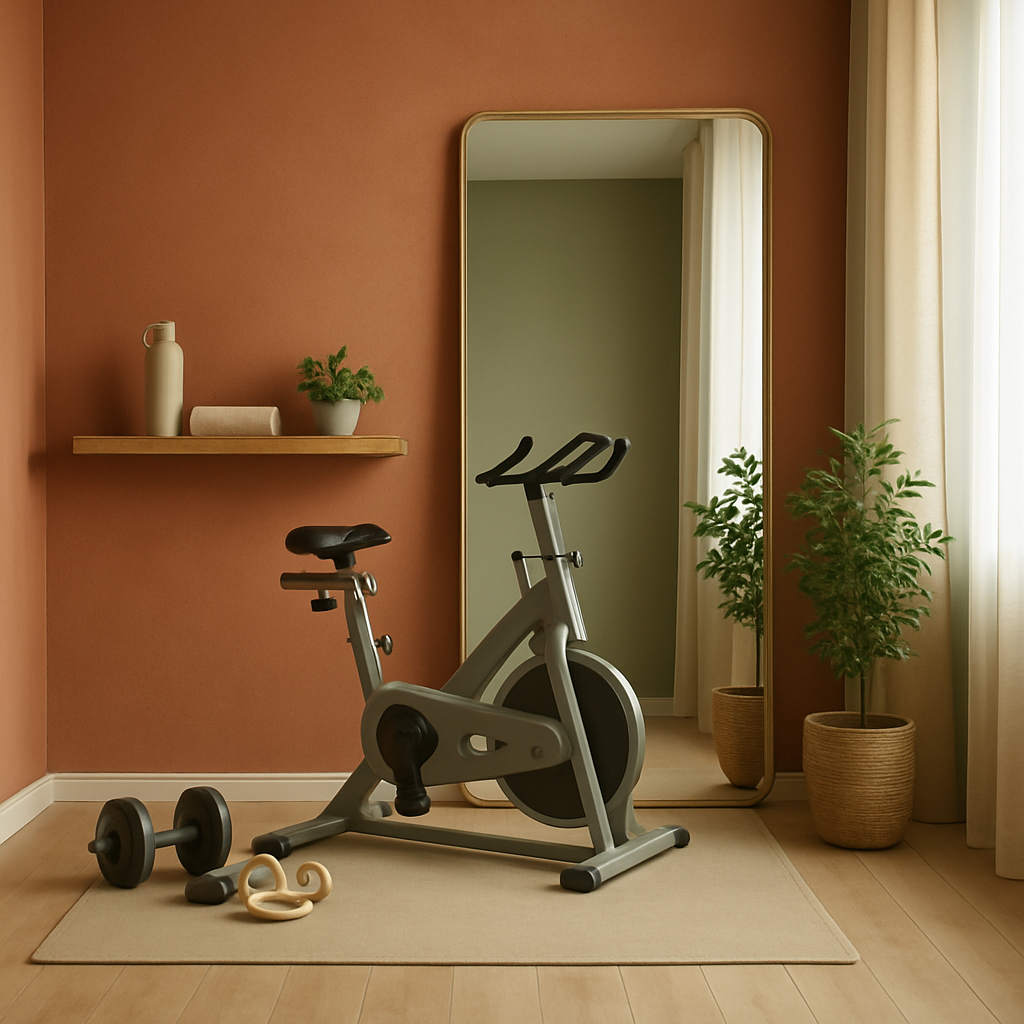
Strategic Mirror Placement to Expand Visual Space
Mirrors serve a dual purpose in a home gym: they allow you to check form during lifts, and they create the optical illusion of a room twice its actual size. Interior designers have used this trick in tight apartments for decades, and it translates perfectly to fitness spaces. Position a floor-to-ceiling mirror on the wall directly facing your primary training position so that you can monitor squat depth, press alignment, and posture without twisting your neck. A second mirror on an adjacent wall adds depth perception and lets you see lateral movement from two angles simultaneously.
Avoid placing mirrors where dropped weights could shatter them. Tempered or laminated glass is the minimum safety standard, and many designers now recommend acrylic mirror panels for home gyms because they weigh less and resist impact. AD PRO has featured several residential gym projects where designers used frameless acrylic panels in continuous runs, creating a seamless reflective wall that feels more like a dance studio than a storage room. The cost for professional mirror installation typically falls between two hundred and five hundred dollars per wall, depending on material and size, which is a modest investment compared to the spatial transformation it delivers.
Lighting interacts powerfully with mirrors, so plan both elements together. A mirror opposite a window will bounce natural light deep into the room, reducing the need for artificial fixtures during daytime sessions. If your gym lacks windows, backlit LED strips along the top or bottom edge of the mirror simulate the glow of daylight and add a polished, boutique-studio feel. This combination of reflective surfaces and layered light is a cornerstone of biophilic design adapted for athletic environments, connecting you to brightness and openness even in an interior room. The lighting strategy itself deserves a closer look, which brings us to the next critical design decision.
Lighting Design That Energizes and Adapts
Lighting in a home gym should do more than illuminate; it should shift your energy state to match your workout. Cool white light in the 4000-5000 Kelvin range promotes alertness and focus, making it ideal for high-intensity intervals and heavy lifting. Warm light around 2700 Kelvin encourages relaxation, which suits stretching, yoga, and cooldown routines. Smart home integration makes it possible to program these shifts into a single switch or voice command, so the room transitions from energizing to calming without manual bulb swapping.
Recessed LED downlights are the most practical overhead option for gyms because they sit flush with the ceiling and cannot be struck by a barbell pressed overhead. Pendant fixtures and ceiling fans with light kits, while popular in general living spaces, create hazards in rooms where weights move vertically. If your ceiling height is under eight feet, surface-mounted LED panels offer the same flush profile as recessed cans without the need to cut into the ceiling structure. Designers registered with the NCIDQ frequently specify color-tunable panels in wellness spaces, allowing the homeowner to dial in exact Kelvin values throughout the day.
Do not overlook accent lighting as a motivational tool. A backlit shelf displaying trophies, progress photos, or motivational quotes adds a personal layer that commercial gyms cannot offer. LED strip lights under equipment shelves or along baseboards create a floating effect that makes heavy racks look lighter, an especially useful trick when you want the room to feel open rather than cluttered. The cost of a comprehensive gym lighting plan, including smart switches and tunable fixtures, typically runs between one thousand and three thousand dollars when handled by a qualified electrician working from a designer's specification. With the room now bright and visually expansive, the next challenge is selecting and arranging the equipment itself.
Equipment Selection and Layout for Maximum Efficiency
Compact, multi-function equipment is the backbone of any small-space gym. Adjustable dumbbells that replace an entire rack of fixed weights, a fold-flat bench that stores vertically against a wall, and a wall-mounted pull-up bar that doubles as a suspension trainer anchor are the three pieces that deliver the broadest range of exercises per square foot. The International Interior Design Association has published case studies showing that equipment footprint, measured in exercises per square foot, is the metric that separates successful home gyms from abandoned ones. Prioritize versatility over specialization, and you will use the room daily instead of monthly.
Arrange equipment so that the heaviest, most permanent pieces anchor the walls and the center of the room remains open for dynamic movement. This layout mirrors the quiet luxury philosophy that dominates current residential design: the most valuable element in a room is often the empty space itself. A squat rack against the back wall, a bike or rower in a corner, and an open center for burpees, jump rope, or dumbbell complexes gives you a three-station circuit without rearranging anything. When the workout ends, the open center becomes a stretch zone, and the room never feels overcrowded.
Cable and pulley systems deserve special mention for small gyms. Wall-mounted functional trainers occupy less than four square feet of floor space yet enable dozens of pulling and pressing movements that free weights cannot replicate as safely. Several models now include integrated tablet holders and Bluetooth connectivity for guided workouts, blending smart home integration with physical training in a way that appeals to tech-forward homeowners. What would your ideal workout flow look like if every tool you needed was within arm's reach? Designing that flow on paper before buying anything is the single most effective way to avoid expensive equipment regret. Once the hardware is in place, the final layer of design addresses the sensory and aesthetic details that turn a functional room into a space you genuinely want to inhabit.
Color, Texture, and Sensory Details That Sustain Motivation
The colors on your gym walls influence effort and mood more than most people expect. Research cited by ASID indicates that saturated blues and greens lower perceived exertion, helping you push through longer cardio sessions, while warm oranges and reds elevate heart rate and aggression, which benefits short, explosive lifts. A practical approach for a multi-use gym is to paint the strength wall in a deep charcoal or navy and the cardio or stretch wall in a muted sage or eucalyptus tone. This two-tone scheme creates visual zoning that reinforces the functional zones you mapped earlier, guiding your brain to shift gears as you move through the room.
Texture adds sensory richness that flat paint alone cannot achieve. A feature wall clad in reclaimed wood planks or slatted oak panels introduces warmth and acoustic dampening, absorbing the clang of plates and the thud of dropped dumbbells. This approach aligns with biophilic design principles, which hold that natural materials reduce stress and improve cognitive function, both useful outcomes when you are grinding through a difficult set. Houzz surveys consistently rank natural wood accents as the number-one desired finish in home wellness spaces, ahead of exposed brick and concrete, because wood conveys calm strength rather than cold industrialism.
Scent and sound round out the sensory picture. A small essential-oil diffuser with peppermint or citrus blends can sharpen focus during training, while a wall-mounted Bluetooth speaker eliminates the clutter of a portable unit and keeps your playlist accessible. These details cost little, often under two hundred dollars combined, but they transform a sterile equipment closet into a multisensory environment that rivals boutique studios charging premium membership fees. Interior designers working on residential wellness projects, where fees typically range from one hundred fifty to five hundred dollars per hour, consistently report that clients who invest in these finishing touches use their home gyms three to four times more frequently than those who stop at equipment alone. That usage difference is the ultimate return on design investment.
Conclusion
A small room does not condemn you to a small workout. By applying the same spatial planning, material selection, and sensory layering that professional interior designers use in every residential project, you can build a home gym that performs far beyond its square footage. Start with an honest floor plan and functional zones. Choose flooring that protects your body and respects your neighbors. Use mirrors and lighting to double the perceived space and tune your energy. Select compact, versatile equipment arranged around sacred open floor area. Finish with colors, textures, and sensory accents that make the room a place you crave rather than a chore you tolerate.
The investment need not be enormous. A complete small-space gym designed with intention can cost less than a single year of boutique studio memberships, and the convenience of training at home eliminates every commute-based excuse. If you are ready to stop treating your spare room as a dumping ground and start treating it as a performance environment, sketch that floor plan today. Consult an NCIDQ-certified designer if your budget allows, or apply the principles outlined here on your own. Either way, the room is waiting, and the only thing between you and a transformative fitness space is a decision to design it deliberately. Take the first measurement this weekend and commit to the process.
More Articles You May Like


Comments
Post a Comment