Finished Basement Bar Designs With Sink and Keg Fridge Options
A basement bar is one of those projects where the difference between "nice" and "unforgettable" comes down to plumbing, refrigeration, and traffic flow. Adding a working bar sink and a built-in keg fridge (kegerator) changes the bar from a decorative set piece into a genuinely functional hospitality zone that can handle a Super Bowl crowd, a neighborhood holiday party, or a quiet Tuesday nightcap with equal grace. According to the National Association of Home Builders (NAHB) Cost vs. Value report, a well-executed basement finish with a wet bar ranks consistently among the top five interior remodels for return on investment, recovering between 70 and 86 percent of cost depending on region.
This guide walks through the practical choices that shape a great basement bar: the style of bar that fits your footprint, the plumbing behind a compliant sink, the refrigeration stack you will actually use, the layout moves that prevent bottlenecks, the materials that survive real life, and the code and safety items that protect everything you build. Skim it once for inspiration, then come back section by section as you start making decisions with your contractor.
Choose Your Bar Style Before You Choose Anything Else
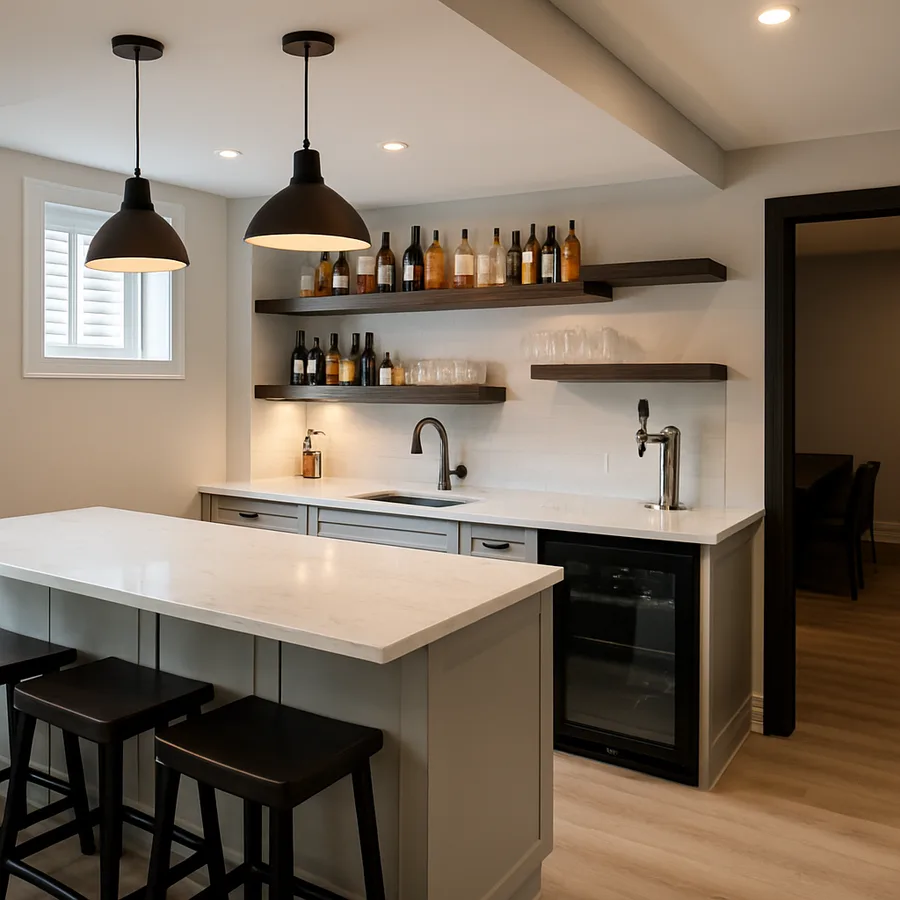
The single most consequential decision is the bar typology. A straight back bar along a single wall is the easiest to plumb and the cheapest to build, typically running 8 to 12 linear feet. An L-shaped bar turns a corner to add counter area for mixing and garnishing. A U-shaped bar creates a fully enclosed service zone that seats four to eight guests on the outside while the host works the inside, and a freestanding island bar anchors the room like a piece of furniture. Each style carries different demands on square footage, sightlines to the TV, and proximity to drains.
Consider how you actually entertain. If you host six to eight regulars for poker, an L-shape with four stools is plenty. If Sunday football draws fifteen, a U-shape with standing room behind it will keep traffic moving. The American Society of Interior Designers (ASID) recommends a minimum 42-inch clear aisle on the working side of any bar and 36 inches behind seated guests, which adds up fast when you sketch it to scale. Tape the footprint on the floor with painter's tape before committing; walking the space with an imaginary tray in hand surfaces problems no drawing will.
Here is a useful gut check: can two people work the bar at the same time without bumping elbows, and can a guest reach the bathroom without squeezing past a bartender pulling a pint? If the answer to either is no, scale the footprint up or simplify the plan.
The Sink: Small Fixture, Big Code Implications
A bar sink looks modest, but it triggers a cascade of code requirements that can surprise first-time remodelers. Under the International Plumbing Code (IPC) and most local amendments, any sink in a finished basement needs a properly vented drain, a trap, hot and cold supply lines, and either a gravity drain to the building sewer or a sealed sewage ejector pump if the sink sits below the main drain elevation. The ejector pit must be gas-tight and vented through the roof, and the pump should be sized for intermittent bar use, typically a 1/2 horsepower unit with a corrosion-resistant impeller.
On the supply side, a 1/2-inch PEX or copper run from the nearest manifold handles a bar sink with room to spare. Include quarter-turn shutoff valves where the lines enter the cabinet so a future faucet swap is a 20-minute job instead of a plumber call. The EPA WaterSense program certifies bar faucets that use 1.5 gallons per minute or less without sacrificing rinse power, which matters when you are cleaning a dozen pint glasses on game night.
Have you thought about what you will actually do at the sink? If the answer is mostly "rinse glassware and fill ice buckets," a 15-inch stainless undermount bowl is plenty. If you plan to wash prep boards and mixing tins, step up to an 18- or 21-inch bowl with a gooseneck faucet. Pair the sink with a dedicated GFCI-protected outlet within 24 inches, as required by the National Electrical Code (NEC) Article 210.8, so blenders and immersion mixers have a safe home.
Kegerators and the Refrigeration Stack
A built-in kegerator is the move that elevates a wet bar into a genuine pub experience. A standard undercounter unit accommodates a single half-barrel keg (15.5 gallons, about 124 pints) or two slim quarter-barrels, and an upgraded two-tap tower lets you pour a stout alongside an IPA. Look for a compressor-based, forced-air unit certified by the American National Standards Institute (ANSI) and listed by UL or ETL. The Brewers Association recommends maintaining draft beer at 38 degrees Fahrenheit with 12 to 14 psi of CO2 pressure for most styles, which a quality kegerator holds with ease.
Refrigeration does not stop at the keg. A second undercounter unit dedicated to bottles, cans, and mixers keeps the kegerator from being opened every few minutes, which stabilizes beer temperature and extends the life of the compressor. Add a clear-ice machine that produces 15 to 25 pounds per day if craft cocktails are part of your hosting identity; clear ice melts slower and makes drinks photograph beautifully. Every appliance under the counter needs dedicated ventilation per the manufacturer's specification, usually 2 to 4 inches of free air at the front louver, or the compressor will short-cycle and die early.
Check ENERGY STAR-certified models whenever possible. A certified beverage center typically uses 10 to 20 percent less electricity than a non-certified equivalent, which adds up when the appliance runs 24/7. Plan your circuits accordingly: each major appliance deserves its own 20-amp branch circuit, and a shared neutral should be avoided on GFCI-protected bar lines to prevent nuisance tripping.
Layout Moves That Prevent Bar Bottlenecks
Commercial bar designers obsess over the "working triangle" formed by the sink, the ice, and the primary fridge, and home bars benefit from the same discipline. Keep those three points within an arm's reach of a single pivot so the host is not walking laps to mix a drink. Add a speed rail for the eight bottles you reach for most, a garnish tray with sealed lids, and a small trash chute cut into the back counter for quick citrus scraps. These are the details that turn a pretty bar into a functional one.
Seating ergonomics matter too. A bar counter at the standard 42-inch finished height pairs with 30-inch stools, while a 36-inch counter pairs with 24-inch counter stools. Allow 24 inches of linear countertop per seated guest so elbows do not collide, and avoid placing a stool directly in front of the sink, where splashes and backwash make the seat the worst one in the house. The National Kitchen and Bath Association (NKBA) publishes detailed ergonomic guidelines that translate directly from kitchen islands to bar counters.
Think about service flow, not just social flow. Can a helper walk behind the host to grab a fresh bottle without interrupting a pour? Can empty glasses return to the bar without crossing the path of full ones going out? These are the questions restaurant designers answer every day, and they apply perfectly to a basement built for a crowd.
Surfaces, Storage, and Lighting That Earn Their Keep
Bar surfaces take abuse that kitchens rarely see: citrus acid, red wine, bourbon, melted ice, and the occasional dropped glass. Quartz countertops (engineered stone) resist stains, do not require sealing, and stand up to heat from warm appliances, making them the most forgiving choice for a home bar. Honed granite and solid hardwood are both beautiful alternatives but demand periodic resealing or oiling. For the bar front, consider reclaimed wood planks, fluted millwork, or a leather-wrapped apron for a tactile signature moment guests will remember.
Storage follows the way you pour. Vertical bottle racks for 24 to 36 bottles, a stemware rack overhead for wine and coupe glasses, a pull-out shelf for blenders and soda siphons, and labeled drawers for bar tools keep the clutter under control. NKBA-certified designers can help right-size storage based on your actual glass inventory, which is almost always larger than homeowners initially estimate.
Lighting should work on three circuits: warm ambient from recessed downlights, focused task light above the pour zone, and accent light behind the bottle shelves. LED strip lighting at 2700K with a 90+ color rendering index makes amber spirits glow and clear spirits sparkle without the greenish cast cheap fixtures often throw. Put each circuit on its own dimmer so the room can shift from a Saturday-night glow to Sunday-morning cleanup-bright with a single tap.
Code, Safety, and the Details Inspectors Check
Permits exist to protect you from mistakes that show up five years later as mold, fires, or flooded drywall. A finished basement bar almost always requires plumbing, electrical, and sometimes mechanical permits, and every jurisdiction expects the work to conform to the latest International Residential Code (IRC) and NEC editions adopted locally. Expect at least three inspections: a rough-in before drywall, a final plumbing test, and a final electrical walk-through. Build those milestones into your schedule.
On the safety side, the U.S. Fire Administration (USFA) reports that alcohol-related kitchen and bar fires spike during the winter holidays, so install a smoke alarm and a carbon monoxide alarm within 10 feet of the bar area and keep a 2A-10B-C fire extinguisher within reach. GFCI protection is mandatory on every bar outlet, and AFCI protection is required on most basement branch circuits under the 2023 NEC. Seal every penetration through the rim joist with fire-rated caulk to maintain the separation between the basement and the floor above.
Finally, think about water. A moisture alarm with a battery backup sitting behind the sink cabinet and another under the kegerator gives you hours of warning if a supply line fails overnight. It is a $30 insurance policy on tens of thousands of dollars of finish work, and the peace of mind alone is worth it.
Conclusion
A basement bar that includes a real sink and a dedicated kegerator delivers a host experience that a simple beverage cart never will. The sink handles cleanup, prep, and hydration without anyone trooping up to the kitchen; the kegerator turns draft beer into a house feature; and the layout around them determines whether a crowded Saturday feels electric or exhausting. Nail the plumbing path, the refrigeration stack, and the traffic flow first, and the finishes will take care of themselves.
Every decision in this guide interacts with the others. A deeper sink needs a bigger cabinet, which shifts the kegerator right, which widens the stool spacing, which changes the ventilation calculation on the bottle fridge. Sketch the plan, tape the footprint, and walk the imaginary tray before you swing a hammer. Involve your licensed plumber and electrician at the earliest design stage, and consider at least one session with an NKBA-certified designer to stress-test ergonomics against your real hosting patterns.
Done well, a finished basement bar becomes the gravitational center of your home's social life. It is the room where a casual weeknight becomes an impromptu gathering, where a friend's promotion gets toasted, and where the next decade of memories accumulates one pour at a time. Few home investments carry that kind of emotional return.
Take the next step by measuring your basement this week, noting every drain, vent, and column, and bringing that sketch to a licensed contractor for a pre-design consultation. A two-hour conversation now will save months of rework later, and you will be pulling your first pint sooner than you think.
More Articles You May Like


Comments
Post a Comment