Reupholstering Vintage Dining Chairs With Modern Fabric Choices
A set of vintage dining chairs is one of the most forgiving entry points into upholstery, and one of the highest-leverage upgrades in any home. The frames are usually solid hardwood, the seats are flat or gently curved drop-ins, and the foam and webbing underneath have almost certainly outlived their useful life. Replacing the textile and the cushioning is a project most homeowners can complete in a long weekend, and the visual payoff is wildly out of proportion to the effort. Done with care, a refreshed set of chairs can pull a tired dining room into a contemporary register without sacrificing the warmth and provenance that made the chairs worth keeping in the first place.
This guide is built around a working assumption that you have between four and eight matched or near-matched chairs, frames in serviceable condition, and a budget that prioritizes durability over fashion. We will move from inspection through teardown, foundation rebuild, fabric selection, cutting, attaching, and finishing, with detours into modern textile science, color theory for mixed-era rooms, and the question every reader eventually asks: how do you balance an antique frame against a fabric that did not exist when the chair was made?
Inspecting the Frames Before You Commit Any Money
Every reupholstery project starts with a brutally honest assessment of the frame. Turn the chair upside down on a clean blanket and inspect every joint. Wiggle the legs gently to check for play at the apron, look for splits at the corner blocks, and press on the seat rails to feel for sponginess that suggests insect damage or dry rot. According to a 2023 industry brief from the American Home Furnishings Alliance, structural failures in vintage seating are responsible for roughly twenty-two percent of upholstery customer complaints, and almost all of those failures were visible at the inspection stage if anyone had bothered to look.
If joints are loose, plan to disassemble, clean, and reglue them with hide glue or a high-quality PVA before any fabric goes back on. Reupholstering a wobbly chair is a guaranteed way to waste hundreds of dollars in materials and labor, because the new fabric will telegraph every movement and the joints will fail again within a year. A reader recently wrote in asking whether a chair with a cracked side rail was worth saving, and the answer depended entirely on whether the crack ran with the grain or across it. With-grain cracks can be glued and clamped invisibly; across-grain cracks usually require a graving piece and are best left to a professional.
Do not skip the underside. The webbing, burlap, and stuffing on most vintage chairs are well past their service life, and a layer of dust mites, decomposed horsehair, and dried-out jute is not something you want trapped under your dinner guests. Plan to strip the seat down to bare wood and rebuild the foundation entirely. The frame inspection should be documented with photographs, ideally including a ruler in frame, so you have a baseline for future restorations and an honest record if you ever decide to sell.
Stripping the Old Upholstery the Right Way
Teardown is messy, satisfying, and educational. The way the original upholsterer built the seat tells you a great deal about what the new build should look like, and it is worth the time to remove fabric and stuffing in layers rather than ripping everything off at once. Use a tack lifter and a small pair of needle-nose pliers, and work from the back of the seat forward so that each successive layer is exposed cleanly.
Save one piece of the old top fabric, even if it is destroyed, because you will use it as a pattern for the new cover. Photograph each layer as you remove it, including the orientation of any pleats, the tack spacing along the rails, and the placement of any internal ties. The American Society of Interior Designers publishes guidance on documenting heritage upholstery that is genuinely useful here, even for amateur projects, because it forces you to slow down and read the chair before you start changing it.
Bag and bin the old materials promptly. Old horsehair, cotton batting, and decomposed foam can carry mold spores and dust mite allergens, and you do not want any of it migrating into your living space. Wear an N95 mask during teardown, work outdoors or in a well-ventilated garage, and vacuum the bare frame thoroughly when you finish. Once the frame is naked, take the opportunity to touch up any worn finish with a paste wax or a thin coat of shellac before the new upholstery covers everything for the next several decades.
Rebuilding the Seat Foundation for Modern Comfort
Modern foam and webbing have transformed dining chair comfort, and there is no virtue in rebuilding a vintage chair with vintage materials. Begin with new jute webbing or a high-density elastic webbing for sprung seats, stretched tightly across the frame and tacked at four-inch centers. A webbing stretcher is a fifteen-dollar tool that pays for itself on the first chair, and the difference between a hand-pulled web and a properly stretched one is the difference between a seat that sags in a year and one that holds its shape for twenty.
Over the webbing, lay a single layer of jute burlap to protect the foam from the webbing edges, then a piece of high-resilience polyurethane foam at minimum two inches thick for drop-in seats and three inches for tight upholstered seats. The Polyurethane Foam Association rates dining-chair foam at a minimum density of 1.8 pounds per cubic foot and an indentation force deflection of around forty, and that combination produces a seat that is firm enough for long dinners and soft enough for guests in formal clothing. Crown the foam slightly above the rails so the finished seat has a gentle dome rather than a flat top.
Wrap the foam in a thin layer of polyester batting to soften the edges and prevent the foam from squeaking against the cover. The batting should overlap the foam by an inch on every side and tuck under the seat. This is also the moment to consider adding a layer of down-blend fiber on top of the foam if your aesthetic leans toward the soft, slightly wrinkled look of high-end European seating. The added cost is modest, and the comfort upgrade is immediate.
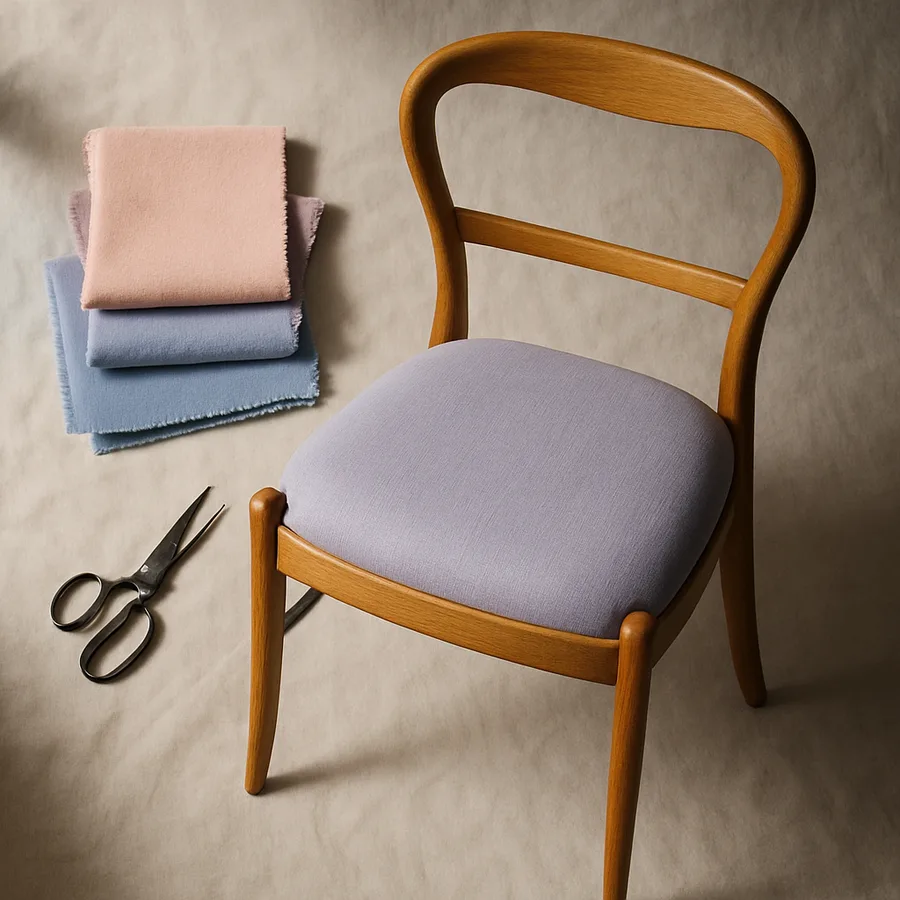
Choosing a Fabric That Will Survive Your Actual Life
Fabric selection is where most projects go off the rails. The temptation is to chase a beautiful pattern in a fragile fiber, and within a year the chairs are stained, pilled, and demoralizing. Begin with the performance question. Dining chairs absorb wine, olive oil, beef juice, lipstick, ink, and the cumulative friction of being pulled in and out hundreds of times a year. The textile you choose should be rated for at least 30,000 double rubs on the Wyzenbeek scale, ideally with a moisture-barrier backing and a stain-resistant finish. Many performance fabrics today exceed 100,000 double rubs and still feel like natural fiber to the hand.
The current generation of solution-dyed acrylics, polyester-linen blends, and treated leathers from mills like Sunbrella, Crypton, and Perennials offers a level of cleanability that simply did not exist a decade ago. Architectural Digest noted in its 2024 textile review that performance fabrics have moved decisively from poolside use into formal interiors, and roughly forty-five percent of new dining-room specifications by interior designers now use a performance textile rather than a traditional decorative one. That shift reflects a real change in product quality, not just marketing.
Once the performance criteria are set, color and pattern follow the room. A common reader question is whether vintage chairs require period-correct fabric, and the answer is emphatically no. A mid-century Danish frame in a contemporary boucle, a Queen Anne side chair in a graphic large-scale print, a 1920s rush-seat chair recovered with a modern jacquard: all of these can read beautifully when the rest of the room is composed with intention. The chair gives the room provenance and the textile gives it currency. Mixing the two is the entire point.
Cutting, Pinning, and Attaching the New Cover
Lay the new fabric face down on a clean, flat surface. Place the old cover, which you saved during teardown, on top as a pattern, and add a generous two-inch margin on every side for wrapping and stapling. Mark the centerline of the seat on both the fabric and the foam, because aligning centerlines is the easiest way to keep patterned fabrics square and symmetric across a set of chairs. Pay particular attention to the direction of the pile or the dominant motif: a fabric with a clear top and bottom must be cut consistently across all chairs in the set or the room will read as visually noisy.
Center the foam and seat board on the back of the fabric and begin stapling at the center of each rail, working outward toward the corners with a half-inch staple spacing. Pull the fabric taut but not stretched, because over-stretching distorts the weave and accelerates wear. The corners are the test of patience. For drop-in seats, a simple double pleat folded toward the back works for most patterns. For more complex shapes, a hospital corner or a hand-sewn boxed corner produces a cleaner result and is worth the additional thirty minutes per chair.
Trim excess fabric, staple a layer of black cambric to the underside to hide the construction, and screw the seat back into the frame. Sit on the chair, shift your weight, and inspect from multiple angles before declaring victory. According to Better Homes & Gardens reporting on furniture restoration, the most common amateur mistake at this stage is failing to test the chair under realistic load before installing the next one, which means a small geometry problem gets repeated across an entire set instead of being caught and corrected on chair number one.
Tying the Whole Set Into a Coherent Room
A set of newly upholstered chairs will visually dominate a dining room until other elements catch up. Plan the integration before you finish the chairs, not after. If the new fabric is bold, keep the table simple and the wall color quiet. If the fabric is quiet, you can introduce a more dramatic pendant light, a painted ceiling, or an oversized piece of art on the wall opposite the table. The chairs should feel like a deliberate decision within a composed room rather than a sudden surprise.
Consider mixing the upholstery slightly across the set rather than making every chair identical. Two head chairs in a contrast fabric, four side chairs in the main, is a classic move that adds rhythm and signals intentional design. A reader recently asked whether mixing within a single set looks unfinished, and the honest answer is that it looks unfinished only when the contrast is timid. Commit fully to the contrast, or skip it entirely.
The last detail is the table itself. A scarred farmhouse table can read beautifully against tightly upholstered modern chairs, and a polished walnut table can look stunning against rustic linen. Most rooms benefit from one element that is unmistakably old and one that is unmistakably new, and the dining set is the easiest place to engineer that tension on purpose.
Conclusion
Reupholstering a set of vintage dining chairs is a project that rewards patience at every stage and punishes shortcuts ruthlessly. The frame inspection determines whether the project is worth starting. The teardown teaches you what the original maker knew. The foundation rebuild determines how the chairs feel in five years. The fabric selection determines how the chairs perform in your actual life. The covering determines how the chairs look the day they return to the room. And the room integration determines whether the entire effort feels like an upgrade or like a foreign object dropped into an otherwise unchanged space.
If your set includes more than four chairs, do one chair completely from start to finish before you touch the others. The first chair will reveal every problem with your workflow, your fabric choice, and your foundation build, and it is far cheaper to discover those problems on a single chair than to repeat them four times. Photograph the finished first chair in the room, live with it for a week, and then commit to the rest of the set with confidence.
If at any point the project exceeds your comfort, the National Upholstery Association maintains a directory of certified upholsterers who can take over without judgment, and many will quote a per-chair price that is competitive with the cost of doing it badly yourself. There is no shame in handing the project off, and the result is a set of chairs that will serve your family beautifully for the next generation.
Pick your first chair this weekend and document everything as you go. The skill compounds, the chairs improve, and the room transforms. For inspiration and deeper reading, browse Architectural Digest's interior galleries, explore Better Homes & Gardens' upholstery tutorials, and consult the American Society of Interior Designers directory when you need a professional eye.
More Articles You May Like


Comments
Post a Comment