Under-Sink Bathroom Storage Pull-Outs to Use Plumbing Space
The cabinet beneath a bathroom sink may be the single most wasted volume in the average American home. A traditional vanity gives you a yawning box, an irregular tangle of P-trap pipes intruding into the middle of it, and two doors that swing open into your knees. Most households respond by stacking plastic bins on the floor, accepting that 40 percent of the cabinet's air is unusable, and quietly losing a tube of toothpaste behind the supply lines forever. Pull-out storage is the elegant solution that has been hiding in kitchen design for decades. Translated to bathrooms, it converts dead air into productive cubic feet without renovating the cabinet.
The math is striking. A standard 30-inch vanity has roughly 8 cubic feet of internal volume. After accounting for plumbing intrusion and inaccessible corners, only about 4.5 cubic feet are usable in a stock configuration. A well-designed pull-out system raises usable volume to 7 cubic feet, an effective 55 percent gain. The National Kitchen and Bath Association (NKBA) has documented similar gains in kitchen sink cabinets and projects equal or greater returns in bathroom vanities, which tend to be smaller and therefore more sensitive to wasted space.
The U-Shaped Cutout: The Single Most Important Detail
Pull-outs work in a sink cabinet because of one critical adaptation: a U-shaped cutout in the back of each tray that slides cleanly around the P-trap and supply lines. Without that cutout, you cannot extend the pull-out far enough to access the items at the back. With it, you get full access to nearly the entire cabinet depth, plumbing be damned.
Sizing the U is the single hardest measurement in the project. Measure the horizontal centerline of the trap, measure the vertical height of the trap and supply lines from the cabinet floor, and then add three-quarters of an inch of clearance in every direction. Do not skimp. Pipes are not perfectly straight, and even quarter-inch contact between a tray and a copper supply line will eventually wear through the line.
Many off-the-shelf pull-out kits come pre-cut with a generic U that fits typical builder-grade plumbing. Custom-fabricated trays, made from 5/8-inch Baltic birch ply with a clear finish, look and perform better but require an honest hour of measurement and another two hours of careful jigsaw work. The Container Store and various specialty cabinet outfits sell adjustable pull-out frames that let you slide the U cutout's position left or right after the frame is installed, which is a clever and underused way to handle the inevitable variability of bathroom plumbing.
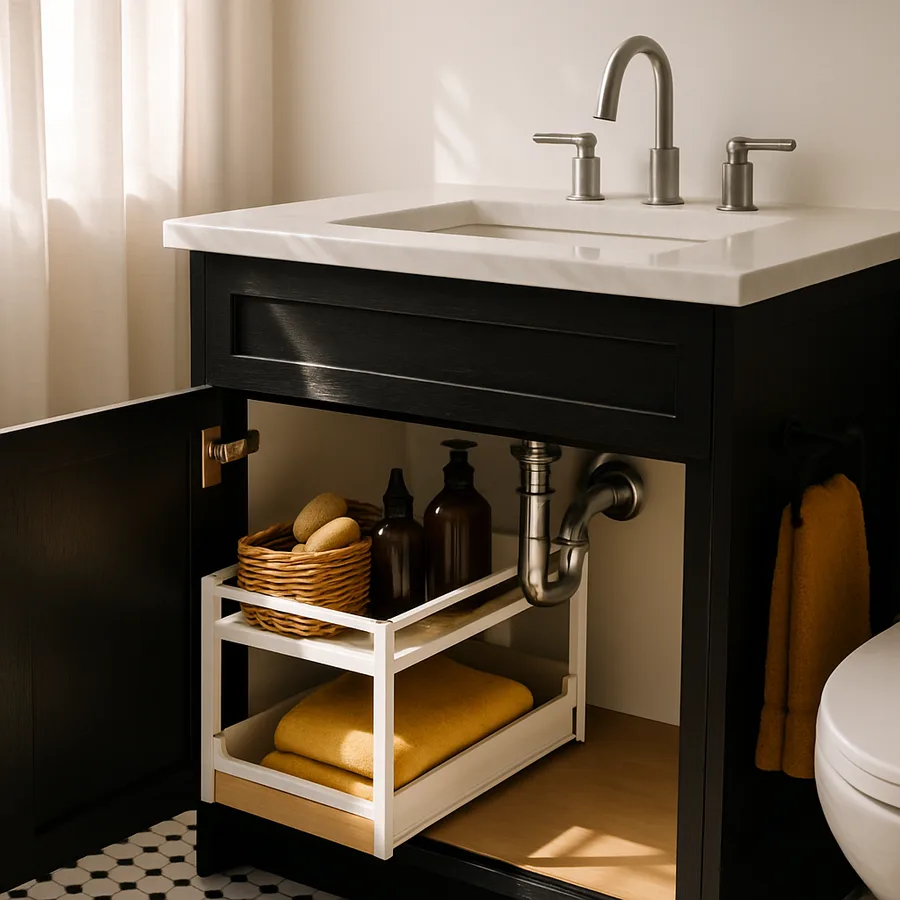
Single Tray Versus Two-Tier Systems
You have two viable architectures: a single deep tray, or two stacked tiers each with its own slide. Each has a use case.
The single deep tray is right when the items you store are tall: hairspray cans, electric razors with charging stands, and refill bottles of mouthwash. Trying to subdivide the height around these items wastes more space than it gains. A 14-inch deep tray with adjustable internal dividers handles tall storage gracefully and reads as cleaner visually because there is only one moving piece.
The two-tier system shines when the contents are short: cosmetics, small skincare bottles, hand towels, and cleaning supplies. The upper tier, typically 5 to 6 inches deep, sits on its own slides about 7 inches above the cabinet floor and clears the trap entirely. The lower tier, 7 to 8 inches deep, runs along the cabinet floor with the U cutout doing the work of accommodating the plumbing. Two tiers in a 30-inch cabinet routinely doubles the perceived storage compared to a single tray, because items no longer need to be stacked on top of each other to fit.
A 2024 case study from Better Homes and Gardens followed a small Brooklyn bathroom remodel where the homeowner converted a single tray to a two-tier system and reported being able to remove an entire freestanding cart that previously cluttered the floor. The cart, the bins on top of it, and the visual noise of all that plastic disappeared in a single afternoon's cabinetry swap.
Hardware Selection: Slides, Soft Close, and Weight Capacity
Hardware is where DIY pull-outs separate from professional ones. Three specifications matter: slide rating, undermount versus side-mount, and soft close.
Slide rating is the dynamic load capacity of the slide pair. For a bathroom pull-out that may carry a full 32-ounce bottle of liquid soap and a hair dryer, a 75-pound rating is the minimum. A 100-pound rating is comfortable. Anything less and the slides will eventually sag, particularly on the lower tier where weight is concentrated and arms have less mechanical advantage to extend.
Undermount slides hide beneath the tray and reveal nothing. They are the cabinetry-grade choice and pair well with custom plywood trays. Side-mount slides bolt to the side of the tray and are visible from the front. They are less expensive, easier to install on retrofits, and acceptable in a working bathroom where appearance is secondary. Both can be soft close, which is non-negotiable in a small room with hard surfaces.
Soft close prevents slammed trays from rattling expensive bottles and from waking sleeping family members in adjacent rooms. The American Society of Interior Designers (ASID) emphasizes acoustic comfort in residential design guidance, and a softly closing pull-out is the bathroom equivalent of a softly closing kitchen drawer: a small detail with outsized daily impact.
Materials: Plywood, MDF, Acrylic, and the Wet-Room Reality
Bathrooms are humid environments. A pull-out that lives below the sink also lives in proximity to the inevitable drip, the inevitable splash, and the inevitable forgotten leaky bottle. Material choice has to acknowledge this.
Baltic birch plywood with a clear water-based polyurethane finish is the gold standard. It resists water gracefully, accepts repairs if the finish is damaged, and looks beautiful for a decade. Sealing all six sides of every tray, including the bottom and the cutout edges, is essential. Skip a side and water will find it.
MDF is cheaper, smoother, and acceptable if it is fully sealed and never gets wet. The risk is that a single ignored leak swells MDF irreparably. For a primary bathroom that sees daily use, the upgrade to plywood is worth the modest cost. Acrylic trays are nearly indestructible and easy to wipe clean but lack the warmth of wood and tend to look more like a kitchen organizer than a piece of millwork. They work well in laundry-adjacent bathrooms and rentals.
The cabinet floor itself deserves a shallow waterproof tray, sometimes called a drip pan, regardless of what storage solution sits on top of it. A vinyl or stainless steel pan extends the life of the cabinet by years and gives you 30 minutes to discover and address a leak before water reaches the floor below. House Beautiful has profiled multiple bathroom remodels where a $40 drip pan saved a $10,000 floor.
Lighting, Sensors, and the Smart-Bathroom Question
Have you ever knelt in front of a vanity at five in the morning, holding a phone flashlight in your teeth, looking for a specific tube of cream? You are the target audience for under-vanity lighting. Battery-powered LED strips with motion sensors, mounted to the underside of the cabinet top facing down into the trays, transform the experience of finding things. Warm white at 2700K to 3000K reads as flattering and does not jolt sleepy eyes.
Smart-home integration is optional but useful. A small Wi-Fi humidity sensor inside the cabinet can ping your phone if humidity rises above a leak-indicating threshold, often 75 to 80 percent relative humidity. The sensor costs less than a takeout dinner and pays for itself the first time it catches a slow drip from a supply line connection. NKBA data indicates that water damage from undetected sink leaks accounts for an estimated 12 percent of homeowner insurance claims annually, which is a number worth paying attention to.
For households with shared bathrooms, a small chalkboard or magnetic label on the front of each tray helps everyone return items to the right home. The labels are mildly fussy, and that is the point. Naming a thing makes it visible, and visible things tend to be respected. The National Association of Productivity and Organizing Professionals (NAPO) consistently endorses labeling as one of the highest-leverage techniques in any organization project.
Installation: A Realistic Weekend Plan
For a homeowner with basic tools, a pull-out installation is a one-weekend project. Day one is measurement, removal of cabinet contents, and a thorough cleaning of the cabinet interior. Inspect the cabinet floor for water damage and address any soft spots before adding hardware. Day two is layout, drilling, slide installation, and tray fitting.
The hardest moment is locating the front face of the slide. The slide must sit far enough back that the tray clears the cabinet face frame when extended, but close enough that the U cutout does not crash into the trap. Mock up the position with painters tape, dry-fit the tray, and verify clearance before drilling a single hole. Most installation failures are mounting errors that could have been caught in 30 seconds of dry-fitting.
Plan for one return trip to the hardware store. There will always be a shim, a longer screw, or a different slide bracket that becomes obvious mid-installation. Treat this as part of the project, not a failure. Even professional cabinet installers buy more hardware than they need and return the surplus. Sources like Better Homes and Gardens and House Beautiful regularly publish step-by-step guides with photographs that can save an hour of head-scratching for a first-time installer.
Cost Realism: A Range, Not a Number
Pull-out projects vary widely in cost depending on how much of the work you take on yourself and how much you outsource. A fully DIY single-tray installation, using off-the-shelf hardware and Baltic birch plywood from a local supplier, runs roughly 80 to 150 dollars per cabinet in materials. The same project with custom-fabricated trays from a local cabinetmaker runs 350 to 600 dollars per cabinet. A two-tier system roughly doubles the materials cost but does not double labor, since most of the time investment is measurement and fitment that you do once.
For a typical 30-inch primary-bath vanity, a reasonable middle path is 250 to 400 dollars all-in for a two-tier DIY system with quality undermount slides, soft close, and Baltic birch trays. Better Homes and Gardens has tracked similar projects in its renovation case studies and consistently finds them among the highest return-per-dollar interventions in any small-bathroom remodel.
Compare this to the alternative: a vanity replacement, which starts around 1,200 dollars for the cabinet alone and frequently runs to 4,000 dollars or more once countertops, plumbing, and installation are added. The pull-out solves the same functional problem at a small fraction of the cost.
Conclusion
Under-sink pull-outs solve a problem so common that most people have stopped noticing it. The reward for solving it is a bathroom that quietly contains everything it needs to contain, with no items piled on counters or stuffed into the laundry hamper because the vanity could not hold them. The cubic-foot gains are real and verifiable, and the upgrade rarely requires more than a weekend and a few hundred dollars in materials.
The most important judgment call is choosing between a single deep tray and a two-tier system. Audit what you store, measure the tallest items honestly, and make the call based on the actual contents rather than a generic recommendation. From there, the U-shaped cutout, the slide rating, and the material choice flow naturally. Plan for water with sealing and a drip pan. Plan for the dark with a small motion light. Plan for shared use with labels.
Organizations including NAPO can connect you with professionals who specialize in compact bathroom storage if the project feels larger than your weekend appetite. The work is straightforward, the satisfaction is high, and the result will be visible every time you open the cabinet for the next decade. Pull everything out from under your sink today, take a single photograph, and decide whether to start with a single tray, two tiers, or both before the weekend is out.
More Articles You May Like


Comments
Post a Comment